

Spring Greenery, Five Ways
It feels official after that beautiful Easter weather – spring is on its way! I've spotted a few buds popping up in my garden, but am all too anxious to start seeing green. Luckily, I've teamed up with the lovely Bronwen from Twig Florals to show you some creative and accessible ways to bring greenery into your home this spring (or year-round)! We had a fun day shooting with Lauren Gabrielle Photography, and I was thrilled to collaborate with Bronwen again, who was the talent behind our wedding florals.
Many of the greens featured here can be found at a garden center or grocery store (think Trader Joe's, Whole Foods, or Heinen's). We'd also recommend calling your local florist – they are usually willing to order anything specific you might need. Just be sure to ask about minimum order quantities, since they are likely working with a wholesale supplier. Continue reading below to learn about the varieties we used, and see how to spruce up your home for spring!


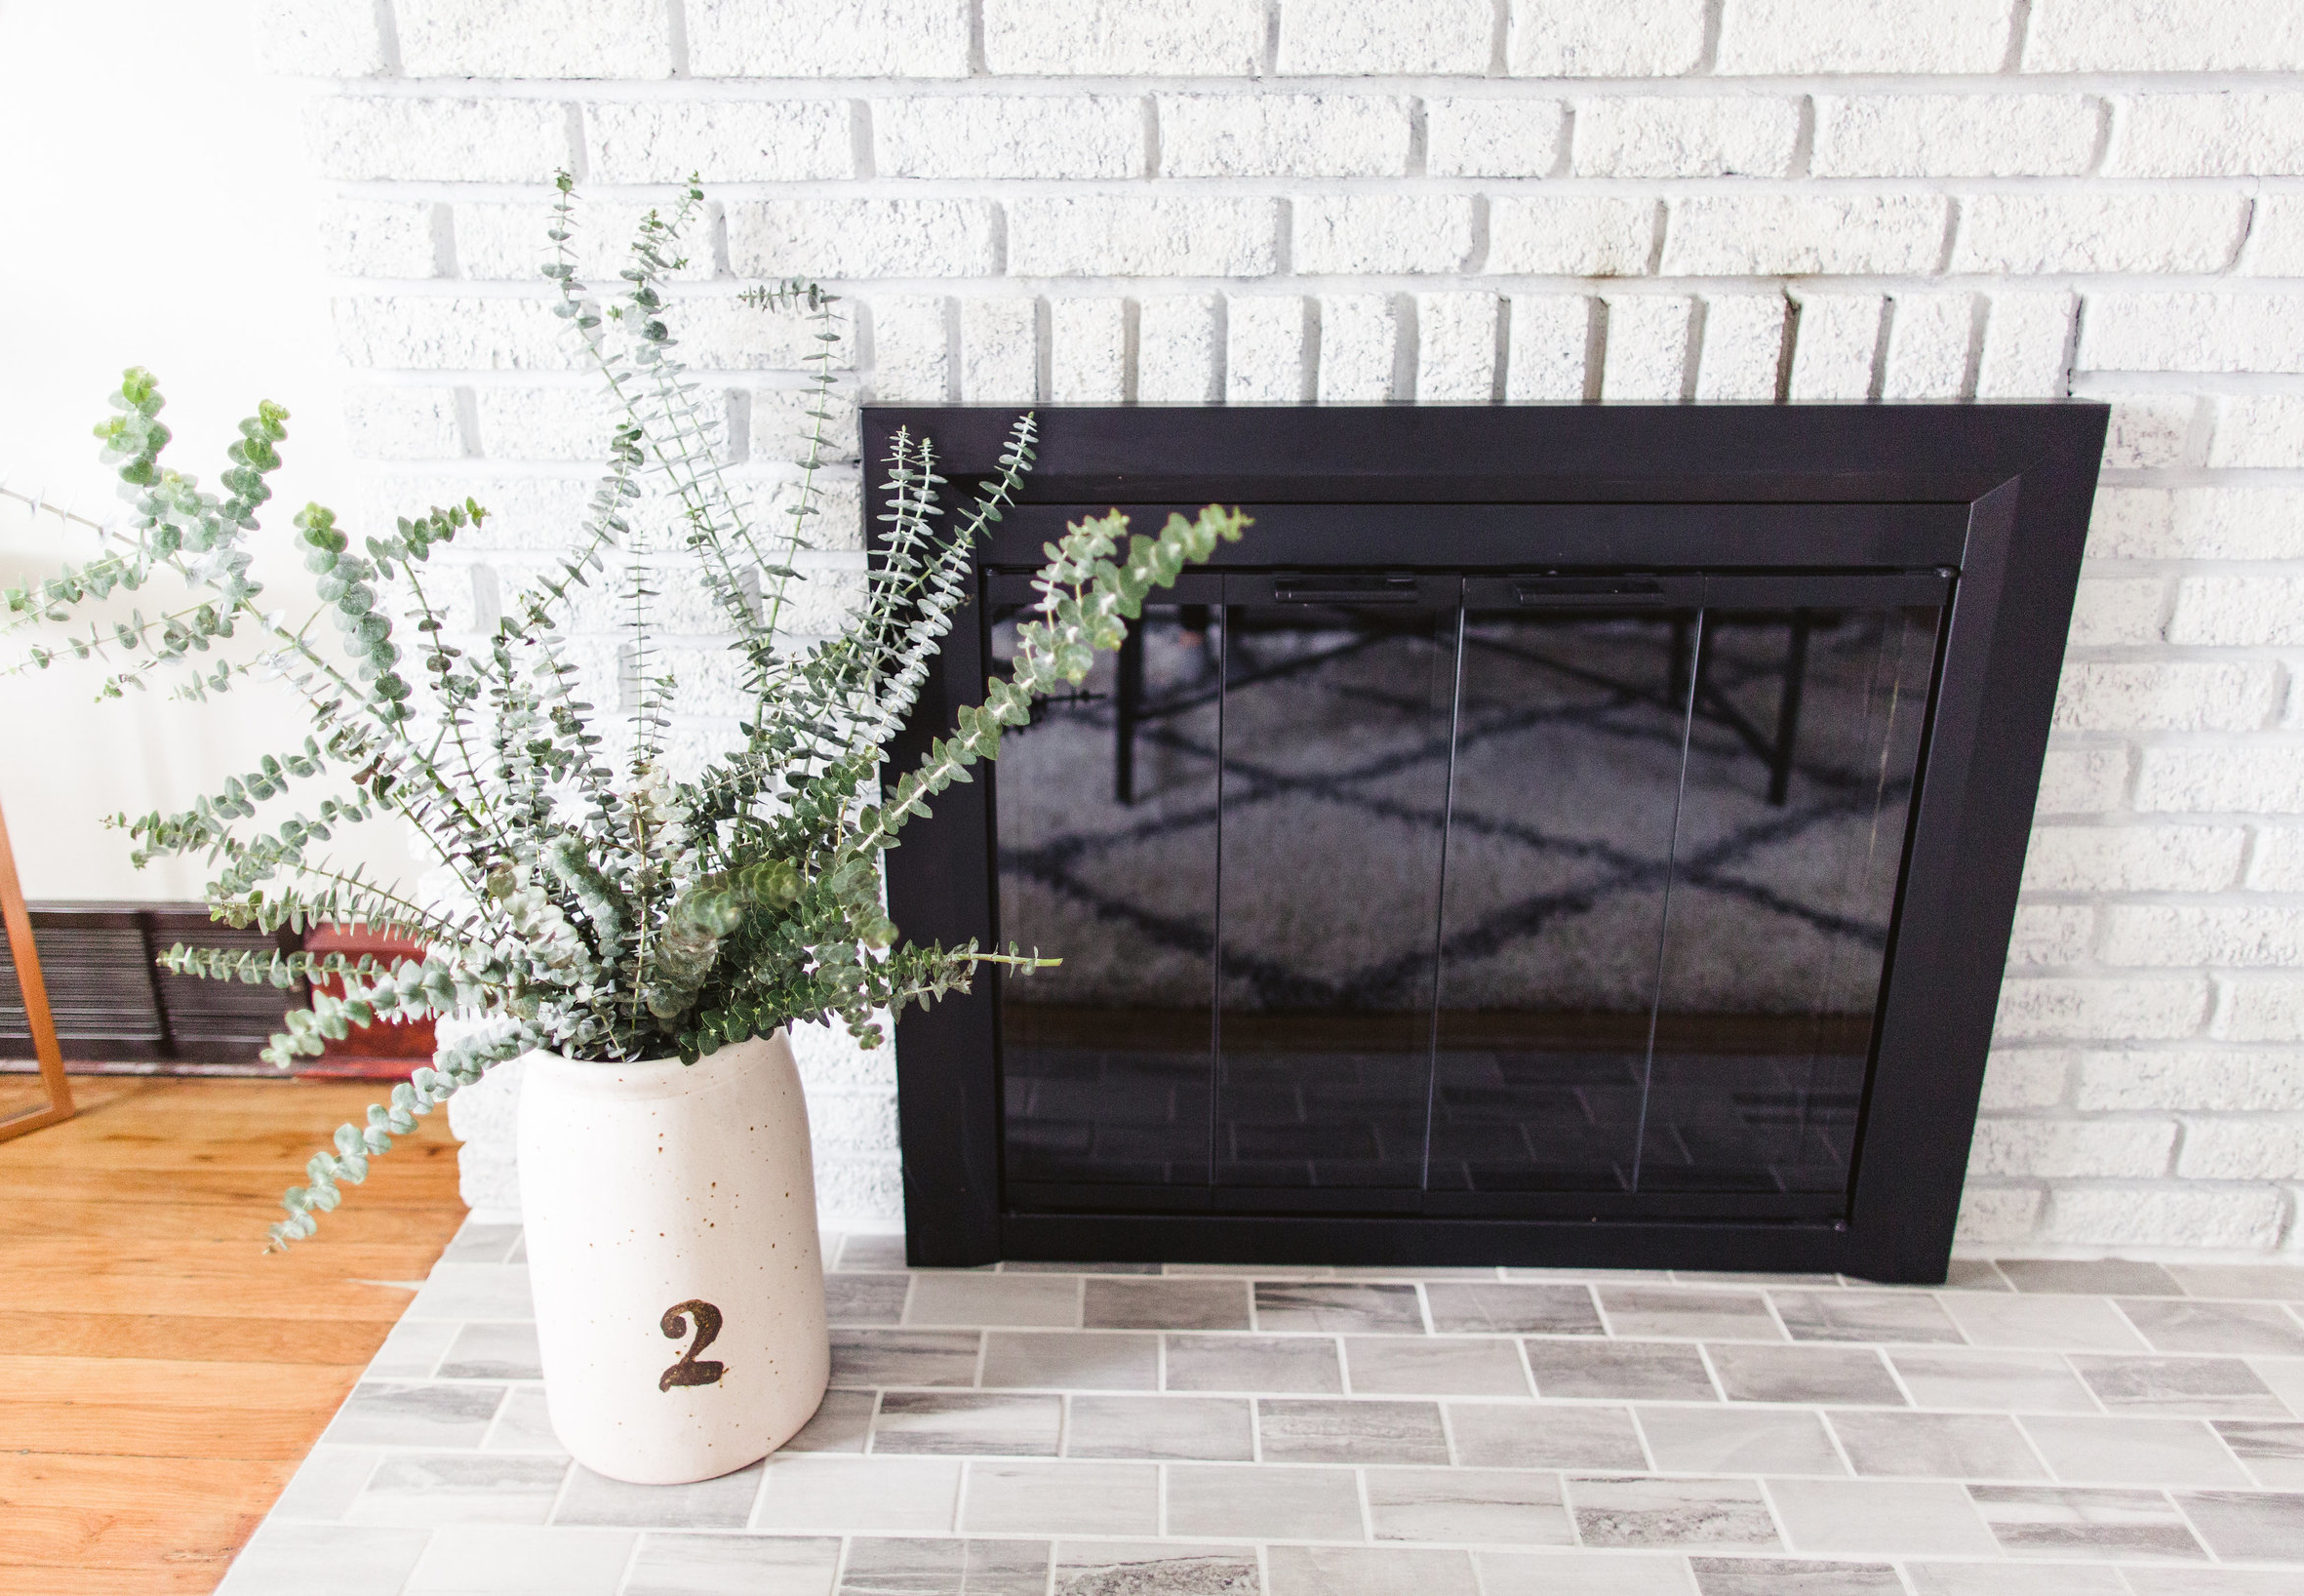
Greens Used: Baby Blue Eucalyptus
Blue eucalyptus can be so impactful – it smells amazing, and its silvery blue leaves add a striking focal point to any color palette. I usually place a sprig or two in bud vases, but loved Bronwen's suggestion to fill a large vessel with a bunch of stems. Here, we used a terra cotta crock and an oversized blue bottle, but you could also recreate the look in a galvanized metal vase or bucket. The look is very easy to accomplish – fill your vessel with water, and place your stems in, a few at a time. Arrange the taller stems toward the middle, with shorter stems along the sides.


Greens Used: Rosemary, Tree Fern
For the freshest greens, look no further than your own backyard! Bronwen suggests exploring your yard or neighborhood for vines, fresh-cut sprigs from bushes, or even herbs from your garden to add to small bud vases or bottles. Rosemary, mint, thyme, or lavender make beautiful and aromatic additions to small spaces or shelves. These would look charming in a kitchen, on a bar cart, or on a side table in a guest room. Don't have an herb garden? Hit up your grocery store for pre-packaged stems in the produce section.


Greens Used: Ruscus Vine, Green Hydrangea, White Aster
This wall arrangement would make a beautiful statement for a party, a shower, or seasonal brunch. Here, we used a "K" as a monogram design, which would be super cute to represent a bride's new last name, or a baby's initial for a baby shower. You could also arrange the greens in a shape instead of a letter – a heart or circular wreath would work nicely. This makes a statement no matter where you hang it – we chose to place it over a mantle, but you could also arrange this over a bar cart or table setup for a party.


Completing this arrangement takes a bit of time and finesse, but it's not overly advanced. We recommend starting with a sketch, then translating that to the wall.
Cut the vine into sections to make up the limbs of the letter (the sizes will depend on how large you're making it). Attach each vine to the wall using masking tape, securing where needed. Try to hide the tape if you can, or choose a tape that matches your wall color. Once your vines are in place, you can add bits of florals to enhance the monogram. Here, we used small snips of green hydrangea and white aster (which look like mini daisies) to complete the spring look. Attach them to the vines using tiny bits of tape.
If you can't get your hands on ruscus vine, you could likely forage some English ivy from your neighborhood (you know, the vines that grow like crazy over fences, walls, basically anywhere you don't want it)! Green hydrangeas always seem to be available at Heinen's (for the local readers) and you could probably find the white aster there as well.


Greens Used: Sword Fern, Tree Fern
For a more everyday look, use a collection of mini bottles to create a statement in numbers. These are easy to find at craft stores or thrift shops, and look great when arranged with a variety of other colors, shapes, and sizes. Here, we filled them with a mix of sword fern and tree ivy – the contrast of the whispy tree ivy and the strong, straight nature of the sword fern makes for an interesting pairing. Sticking with only 2-3 types of greenery will also keep the look from getting too busy. Arrange them on a console table as shown, or line them up on a dining table for an interesting centerpiece.


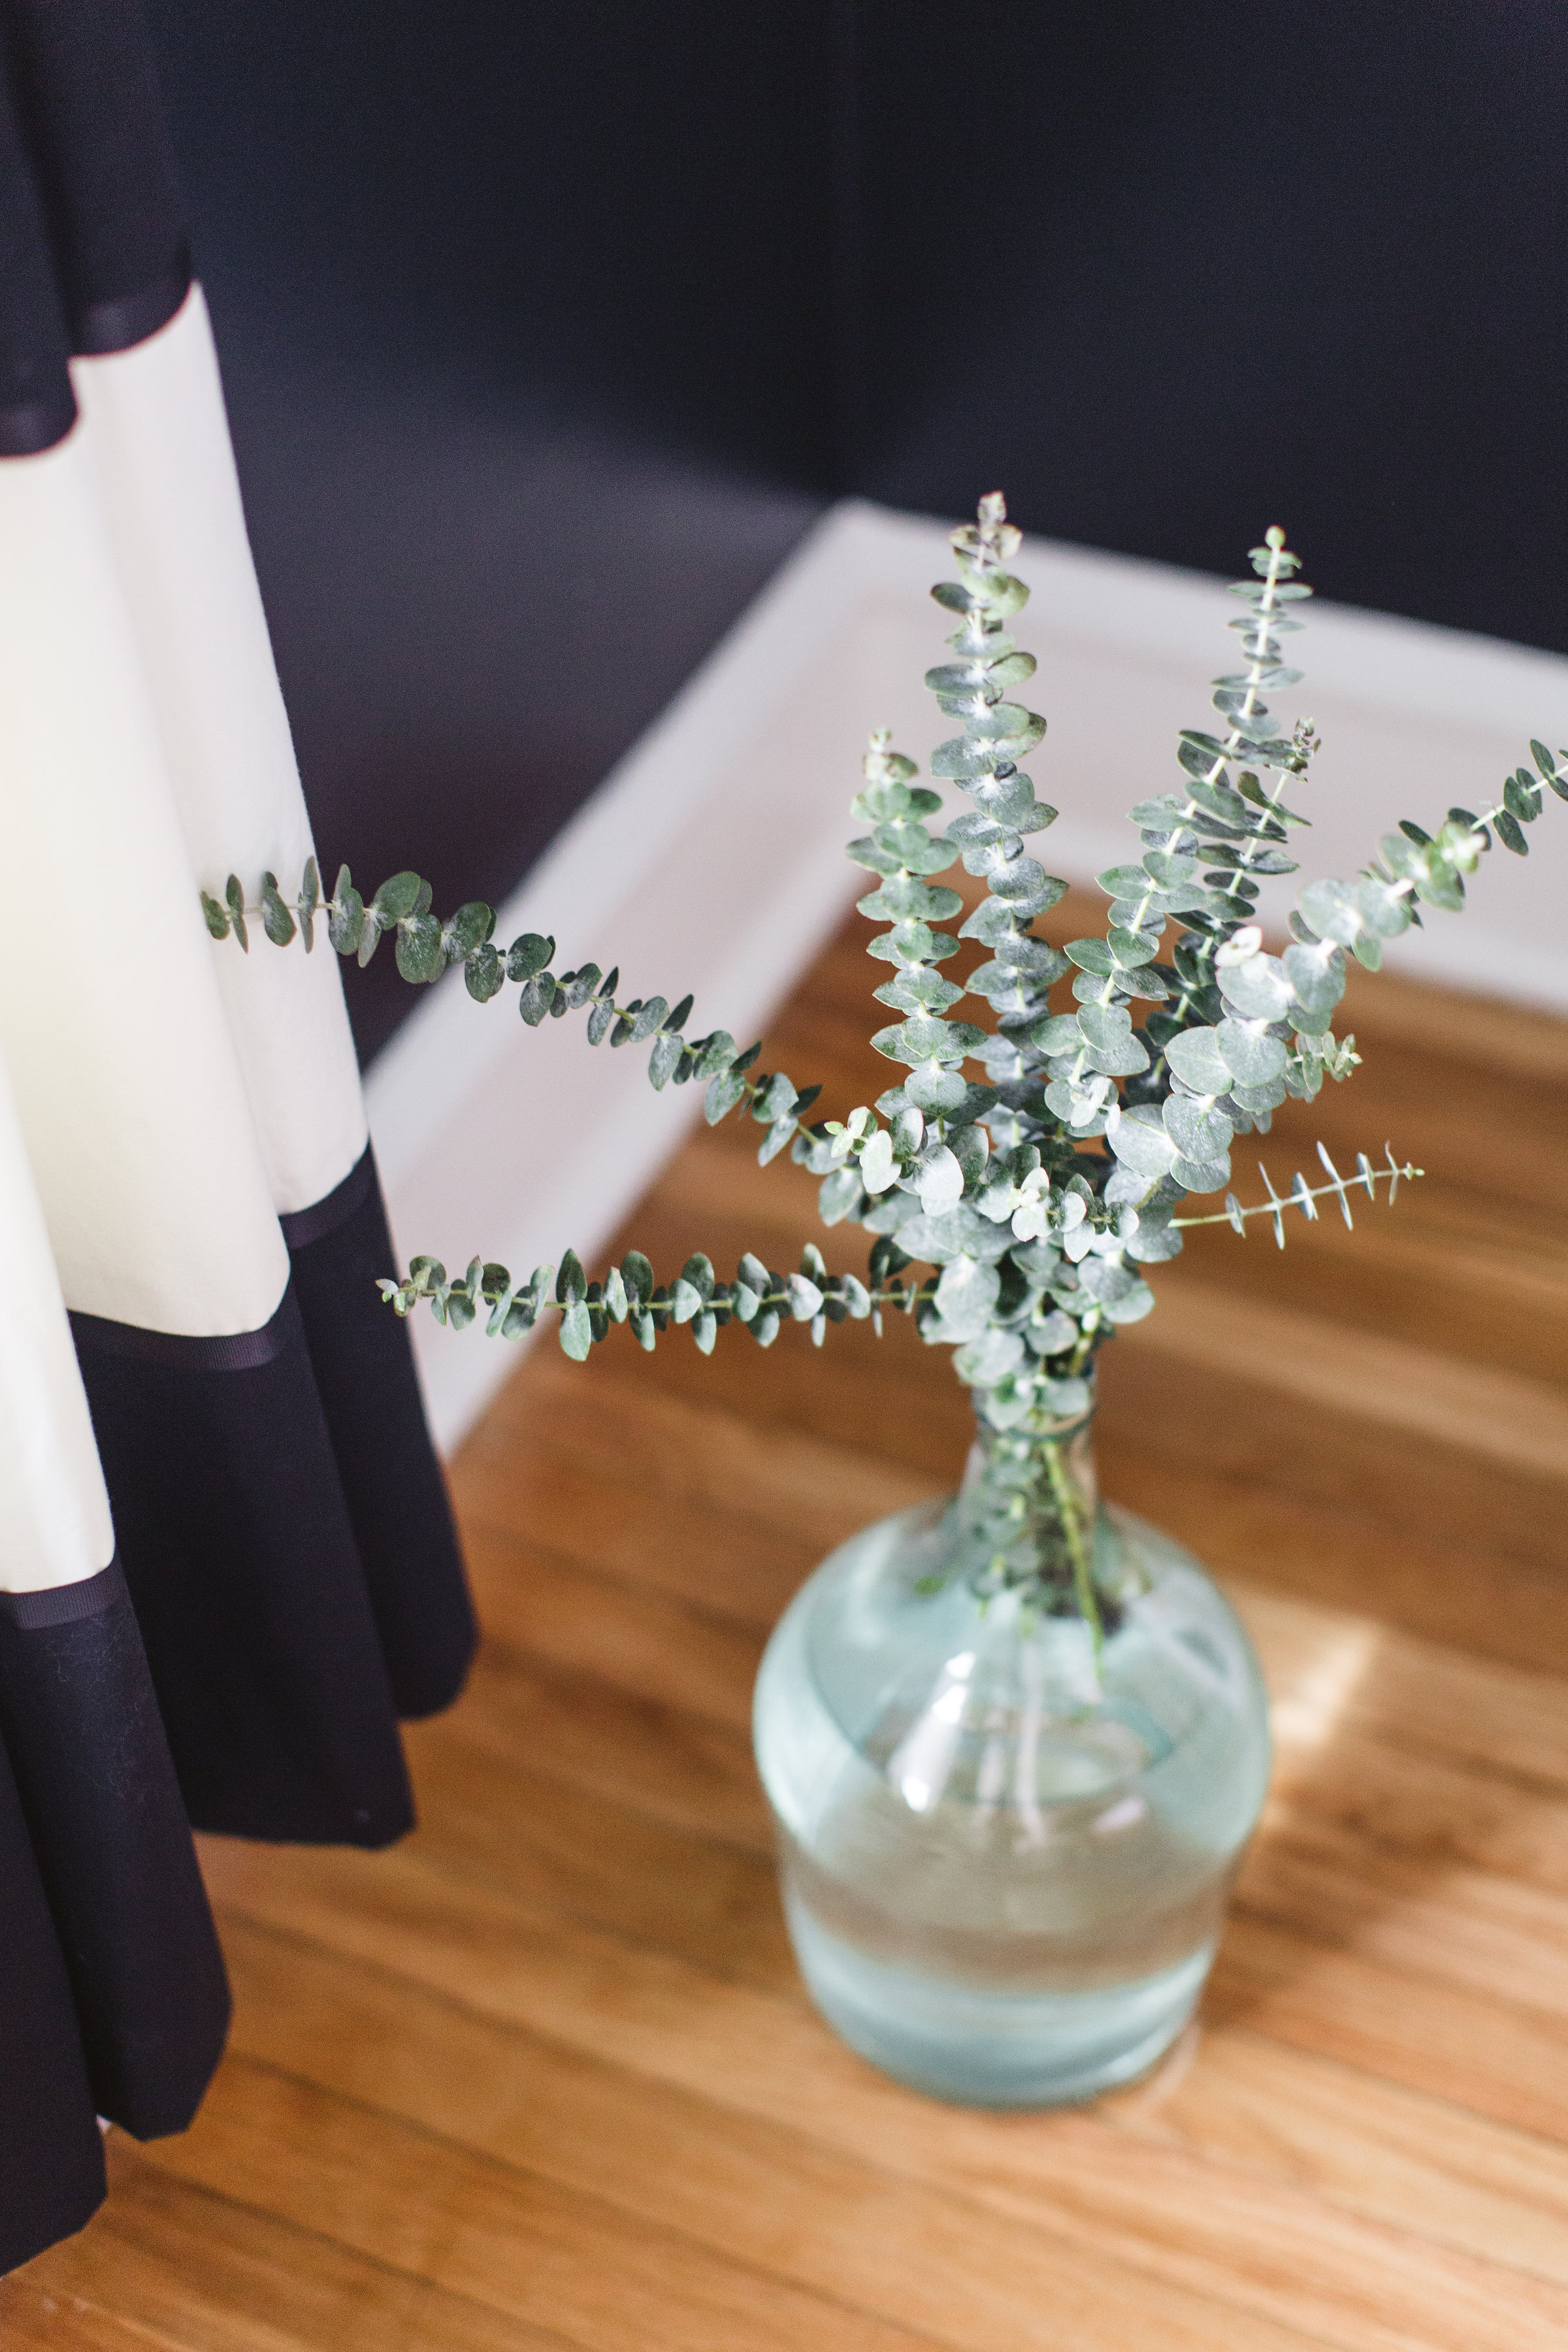
Greens Used: Seeded Eucalyptus, Rosemary
This is another super simple (yet super beautiful) way to spruce up your dining table for a spring brunch or a romantic dinner at home. To create this look, you'll want to start with approximately 10-12 stems of seeded eucalyptus. You can usually find seeded eucalyptus at a premium grocery store, but I've also been able to get it through a local florist.
Using scissors or pruning shears, trim off the thick portion of each stem, leaving only the more delicate main stem that the leaves and seeds are attached to. Starting from one end of the table, place one stem after another, overlapping them to create fullness. Fluff and arrange the leaves as needed to fill in any gaps or to hide the stems of the other pieces. And that's it!


You can enhance the look by introducing some greenery in your place setting – here, we simply tucked a sprig of fresh rosemary into the napkin ring.


Another way to enhance the "green" of your table setting is to include them in in edible form! We loved the added sprigs of mint on the cakes – it looks so fresh and ties the greenery element into the desserts. These stunning bundt cakes were made by Salt + Honey Baking Co. and tasted as luxurious as they looked. We were certainly not complaining about eating the props ;)
Bronwen and I were excited to share this little dose of DIY, just in time for spring. I love to bring the outdoors in, and until my garden starts blooming, these are five easy ways to do it (which don't involve the constant care of a houseplant, either)! If you have questions about any of the looks you've seen here, feel free to leave a comment and either Bronwen or I will happily answer them. Huge thank you again to Bronwen, Lauren, and Salt + Honey for making this little collaboration happen. Happy spring to you all!
DIY Kate Spade Inspired Glitter Studs

There are few things that feel worse than shopping regret – running out of beer is a close second – but I experienced this on a facepalm-worthy level last week. I'd had my eye on these cute little Kate Spade glitter earrings but was resisting the urge to buy, since it's Christmastime and I guess I should shop for other people? Is that how it works?
Until one day when I was shopping for other people, and saw them again, during a 20% off sale. I added them to my cart, deciding they would stalk me forever if I didn't. I stepped away for a few minutes, came back to click "submit" and I get the dreaded error message: "THIS ITEM IS UNAVAILABLE." I'm sorry...WHAT.
I refreshed, I tried re-adding, searching every other site that carried them...Sold. Out. Everywhere. If I had any idea that these were possibly the LAST ONES OUT THERE I wouldn't have thought twice. Ugh. So mad.
But why get mad, when you can get even...I set out to try to replicate them myself. The results were great and the best part is, you can really make them look however you want them to. Although if you're feeling lazy, you can find the original earrings on ebay, selling for upwards of $114 (no joke).

WHAT YOU'LL NEED:
Gemstone stud earrings
Glitter nail polish – any color or a combination of a few
(the colors I used are pictured above: OPI for Sephora "Only Gold for Me," Deborah Lippmann "99 Luftballoons" and Wet 'n' Wild "Party of Five Glitters")
Needlenose pliers
A hairdryer

DIRECTIONS:
1) Start by removing the stones from the earring setting – use the needlenose pliers to gently bend the prongs back to loosen the stone. I only bent two prongs instead of all four, and it was enough to get the stone out. I had these earrings already, but you can find similar ones at Target, or even use a pair of Kate Spade ones to get the most accurate look.
2) Holding one stone with your pliers, apply a thin layer of glitter topcoat to the earrings. Try to cover the edges as well – that's one advantage of removing the stone from the setting. Let each layer dry before adding another one (this is where the hairdryer comes in handy). Layer the polish on however you like – I used three types of glitter to get the multi-colored look I wanted. The original earrings had a lot of gold, pink, blue, and red-orange.
3) Let the polish dry thoroughly before replacing them into the setting – I let mine dry overnight just to be safe. Snap the stones into place and bend the prongs back over them. Using nail polish instead of loose glitter keeps the glitter from flaking and shedding all over the place, but that's another option to try if you want a different look.

Now I don't feel so bummed, and have some fun studs to wear for the holiday season. Crisis averted!
Ship's Wheel Mirror Makeover

When it comes to antiques, I'm usually cautious about altering their appearance in fear of destroying their value (file this under: everything I know I learned from Pawn Stars). We were faced with a lot of these decisions when we moved into our house – we had to decide what needed to be kept and what was okay to touch. For example, our living room is full of original cherry wood trim...and even though it wasn't my thing at first, it's an element that adds real value to our home, and we'd be crazy to paint it. Now I'm happy it's there – the wood is beautiful, and makes our living room feel like a modern cabin.
On the flip side, just because something is an antique doesn't make it valuable (though it could be emotionally valuable) and a little coat of paint isn't going to hurt anyone, if it makes you happy.
Jim and I decided to check out the Lakewood city-wide garage sale a few weekends ago and after heading down a ton of driveways, we found this antique mirror with a $5 sticker on it. I'm sorry – what? $5. This is why I love garage sales.
The bones of it were there, but we knew the paint job and the metal stars wouldn't really fit our decor. Thankfully the mirror was made of wood and not metal, so we knew we could give it a quick makeover and find a great home for it on our walls.
I actually can't take any credit for this makeover, because Jim did it all himself, but hey...I art directed?

He removed the metal stars, which were just pinned into the frame with small nails, and then stripped off the paint with
. This causes the paint to bubble and peel like tar, so be sure to wear gloves when trying this at home. He used a shim to scrape the paint off once it became loose. Once the paint was removed, he used wood filler to fill the cracks where some of the pieces were separating, and gave the piece a final sanding.
We actually liked the distressed look that the stripping/sanding process gave, so we left the mirror as is. I debated about white-washing it, or putting the stars back on, but decided against it. You can always add, but you can't always take away.

It turned out to be the perfect piece we were missing in our second floor stairway. I love it more than I expected – for $5 I figured it was a risk-free project, so it was great that it came out so nicely. I can't really say no to something nautical for a few bucks, anyway.
Do you shop garage sales? Are they worth it for you, or too hit-or-miss?
Giveaway: Wrapping Paper from Pattern Pod


SO - for the fun part. Starting today, enter below by completing some or all of the entry options. One winner will be announced Friday, 12/13 here on the blog. From there, we'll get in touch and get you what you need to start wrapping!
Good luck!
*Disclosure: This post was sponsored by Pattern Pod. I received one prize for myself and one prize to give away. As always, opinions are my own and promotions are shared because I, too, love the products.
a Rafflecopter giveaway
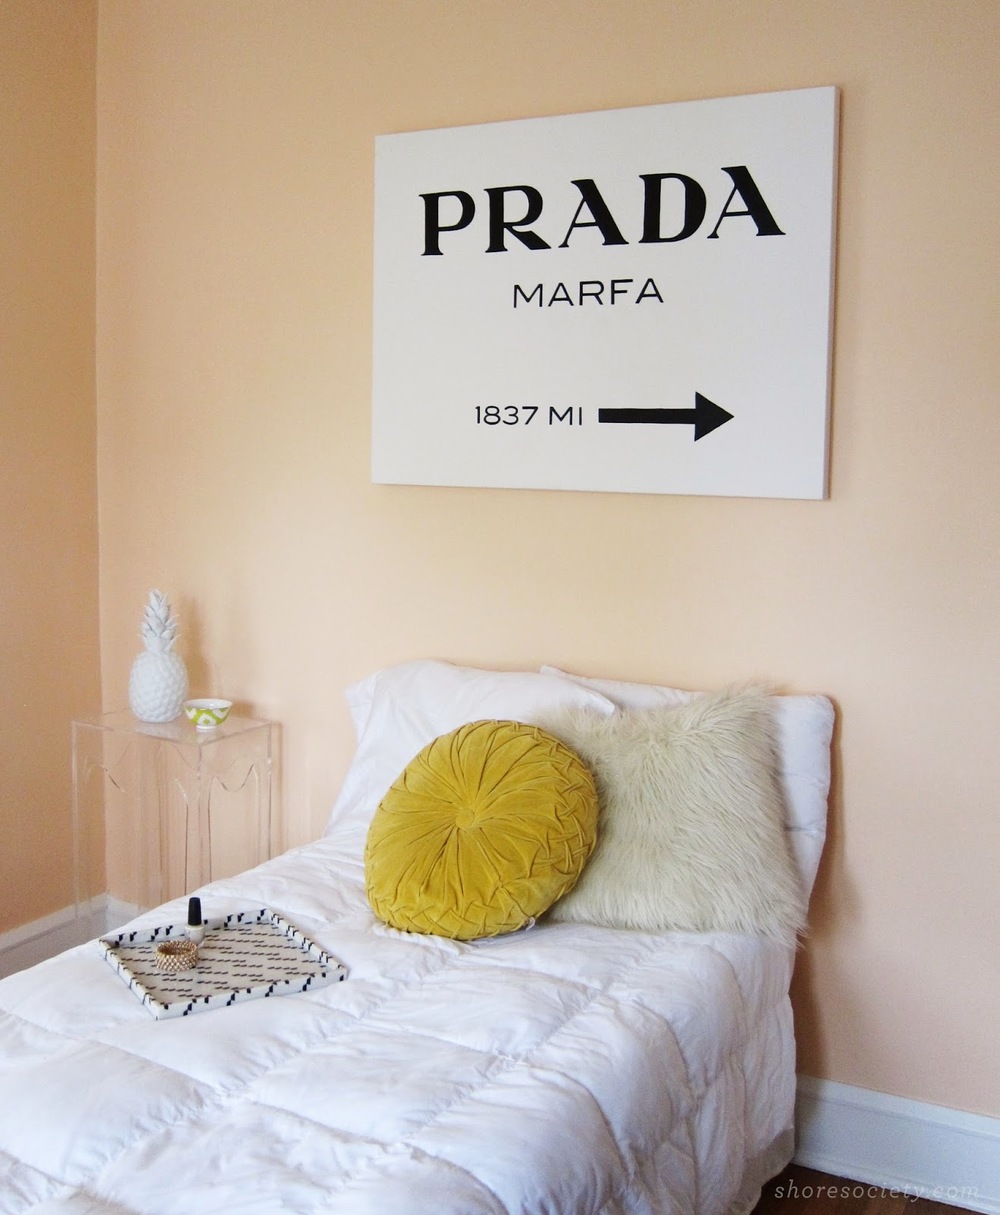
DIY: Prada Marfa Sign
When it comes to Gossip Girl, I am not embarrassed to admit that I know a bit too much about the show, and anyone who's a fan knows about the top-notch art collection shown in GG's various Upper East-side apartments.
One of the set's most recognizable pieces is an illuminated sign by Elmgreen and Dragset, meant to serve as a road sign for the pair's famous art installation – a non-functioning faux Prada store about 60km outside of Marfa, Texas. It serves as a perfectly chic backdrop to the stylish characters and money-drenched drama—it's always somewhere in the scene. It's black+white and gorgeous, so clearly, I wanted it in our peachy-glam guest room.
As an art enthusiast lacking an art collector's budget, my only options to own this iconic piece were to either purchase a canvas version here, or make my own. You all know I like a challenge, so off to the drawing board I went. This looks a lot harder than it was (although it takes a steady hand) so here's a step-by-step plan if you're interested in making your own.
WHAT YOU'LL NEED:
Pre-stretched art canvas - I went with 30x40" for the full large-scale effect, like the original.
Black acrylic paint + brushes
Black permanent marker
Printer
Adobe Photoshop or image editing software
X-acto knife and cutting mat
Ruler
Easily removable tape (painter's or washi tape will do)

1. Start by creating the template for the design. To do this, I used an image of the artwork online, and imported it into Photoshop. I created a new Photoshop file in the size of the canvas (30x40") and imported the image as a layer in that file. I played with the scale of the art until the size looked correct, and printed the giant image out by tiling it onto regular letter-sized sheets of paper. Each printer is different, so I can't exactly walk you through how to do this, but Google can be helpful if you're not sure. Since you'll be scaling up a low-res web image, the letters will be pixellated, but you can cut away that fuzzy pixel halo when you trim the letters out.
2. To make the stencils, you'll carefully cut out each number and letter. I found that it made the most sense to cut the larger characters out ("Prada" and the arrow) and the smaller characters away from the sheet of paper, keeping them together like a stencil. This way, they're easier to trace and you won't have to worry about aligning each letter on the baseline, as they're already aligned for you.
3. Use a ruler to figure out the placement of the stencils on the canvas. I recommend having an image of the actual art pulled up on your computer, or printed out, so you can reference the linespacing. It won't necessarily be mathematically even, you just want it to look right. Double-check all of your measurements to be sure nothing is slanting up or down—the type is the hero here, and anything "off" will become pretty obvious once you paint. When you're sure, carefully tape everything down.
4. Now, trace everything. Use a pencil and be very, very gentle. It's difficult to erase pencil off of canvas, and you'll only need a ghost of a line to guide you during the painting process.

5. Once you've outlined everything, remove the stencils and tape and double check that everything looks correct before you begin to paint. I suggest taking a look from a distance – prop the canvas up against a wall and see how it looks from there.

6. Finally, you'll paint in the letters. You can make it easier on yourself by outlining the letters with a marker first, to get crisper edges. You'll probably need a few coats of paint to get everything looking solid. It's actually better to have your paint thinned down a bit with water or acrylic medium, because it will make the paint glide more smoothly across those detailed curves. Just keep layering the paint on, allowing it to dry between coats. Acrylic dries very quickly—by the time I finished one application, the first letter I did was ready for a recoat.

Easy as that! I feel like Lily Van Der Woodsen already. We're still working on finishing up the guest room, but this is starting to pull it all together. Let me know if you decide to give it a try!
DIY: Distressed Wood Wall Art
This little project is probably topping my list of easiest DIY ever.
I've seen a lot of cute distressed wood cut-outs in decor shops and online sales like One Kings Lane, but knew it would be just as easy to make my own and have it exactly how I wanted it. We had a bit of a dead space in out bathroom above the towel bar, and since we already have art and floating shelves on the other wall, I needed something different. With our bathroom decor feeling like a cloudy day at the beach (the only way I can describe it), I knew a little wood whale would be perfect.

I purchased the cut-out whale from Nana's Little Nest on Etsy – it was a pre-cut item but Cindy also does custom work, so you can get exactly what you're looking for. The rest of the DIY is almost too easy.

Once you have your cut-out, you'll paint it whichever color you want (I used acrylic paint). Since we wanted ours to be white with the natural wood showing through in the distressing, we just painted it white, but if you want to do a two-color look, you'll paint the first layer one color, and the second layer your most dominant color. You'll basically just be lightly sanding away the top coat to reveal what's underneath.
Your paint doesn't need to be perfect – as you can see in the photo, I didn't even paint it solid white – but you do want to follow the grain of the wood. Let it dry overnight before sanding it.
Use a few different sizes of sandpaper to gently sand away sections of the surface. Again, follow the grain. I started with a fine sandpaper, then roughed up some areas more with a higher grit to really bring the wood through. I also sanded the paint off the edges for a bit more wear and tear, as shown below:

After it's finished, you can mount it to the wall using double-sided mounting tape. We had some cork furniture pads laying around, so we used those to give a little more dimension, and keep it from looking flat on the wall.

The entire project cost about $5, no joke. Now I'm debating another one...just have to figure out where to put it! It perfectly solves for the awkward space on the wall, when you don't want to just throw up more pictures in frames. How do you typically solve wall decor challenges?
DIY: Gold Leaf Tortoise Shell

This week's DIY is up there as a favorite of mine — I've never attempted gold leafing before, but it was incredibly easy and only took an hour or so!
I've had my eye on the Nate Berkus for Target tortoise shell sculpture ever since it came out, but I hesitated to buy it. The colors weren't quite what I wanted, and the $40 price point seemed a bit steep for the quality. I kept my eye on it, and when it was still in stock months later, and on sale for $25, I bought this ochre colored one and knew I'd find a way to make it work.
Initially I thought about spray painting it, but happened to find instructions on how to use gold leaf, and knew it would give a more dimensional look and make the shell pop against our navy bedroom walls.
Metal leaf is available in many different types and colors, and you can find it sold in kits at any local art/craft store, like Michael's or Pat Catan's. It works on most porous or non-porous surfaces, so you can apply it to almost anything, and really bling-out your house!
Now for the how-to!
YOU'LL NEED:
Object of your choice / tortoise shell
Gold leaf kit (with leaf sheets, adhesive, and sealer)
Paintbrush
A soft cloth

DIRECTIONS:
1) Before shot - not bad, but not great either.
2) Using your paintbrush, spread the adhesive evenly over the surface. According to the package instructions, the adhesive needed to air dry for 30-40 minutes to become tacky enough for the leaf to stick.
3) Begin applying the gold leaf, one sheet at a time. The sheets come in small squares, and are very delicate. They might even break apart a bit before you place them on the shell — it's okay, keep the little pieces nearby for when you need to fill in small gaps.
Press the leaf gently onto the surface with your fingers, then smooth the leaf out carefully with a soft cloth. Work in sections, filling in the gaps with your scrap pieces as you go. The tricky part about the surface of the shell are all of the grooved lines — the full sheets won't reach down into the cracks, so you can fill those areas with leftover pieces after you finish the main body.
4) Using the cloth, smooth out the leaf, pressing carefully and moving in circles. The leaf won't look totally seamless, which is okay, it's what gives the finish more dimension! Once you've inspected the shell to make sure the gaps and sides are covered, you'll spread the sealer over the entire thing. The sealant keeps the gold leaf from coming into contact with the air, which prevents the gold from tarnishing.
Let the shell dry overnight before hanging or placing back among your decor.

And that's it! The whole project cost only about $35, and easily looks twice the price. I haven't been able to find anything with this impact anywhere else, and in such an accessible price range. Well worth the effort! Would you guys ever try gold leafing?
DIY: Gold Art Deco Mirror

I've been hoping to share this DIY post for a while, but have been holding off because I haven't had the slightest clue what happened to my process photos. Those are, you know, usually helpful so you'd at least have a clue how we made this mirror! But alas, I've searched all of my devices and come up with nothing. So I'm sharing the final results with some instructions, and since you are all just so talented, I know you can figure it out!
This is a great way to give a plain, old, or cheap mirror a new life. This mirror has somehow been dragged from place to place each time we moved, despite us never liking it/having a place for it. When I put together my vanity table, I thought it would be the perfect fit, but just needed a little glam-ifying :) It's perfect to share this week, too, since The Great Gatsby premieres tomorrow, and we'll all be having a love affair with Art Deco after that!
YOU'LL NEED:
A wood mirror
Fine grit sandpaper (300+)
Gold spray paint (or any color you choose)
Clear gloss spray lacquer
Blue painter's tape
Newspaper
Pencil and ruler
DIRECTIONS:
1) Gently run the sandpaper over the entire frame of the mirror, going with the grain of the wood. You're not trying to sand away imperfections, you just want to give a light buff to make it easier for the paint to stick. Wipe the dust off with a soft, dry cloth.
2) Put newspaper over the mirror area inside the frame, trying your best to tuck the newspaper under the wood frame to prevent any overspray from getting on the mirror. You don't need to tape it in place at this point.
3) Begin your measurements – start by measuring the dimensions of the entire mirror. Divide each length by two – this gives you your center points. Mark your center points on all four sides lightly with a pencil. You will do all of your measuring starting with those points and working your way out to the edges. Then, you'll want to do some simple math to determine where your stripes will be placed. Depending on how wide you want them to be (mine were about 1.5"), you can divide that into the space you have in each half (from center point to edge) to see how many stripes you can fit in. Then, you'll make pencil marks where your tape will go. It's tough to tape off diagonal lines, so I diagrammed it a bit below so you can get the idea:

4) Now, you'll tape off the areas where you want the wood to show through. Run the strips of tape around the inside lip of the frame and onto the newspaper (covering the mirror) to make a continuous line. Then, make sure your tape is sealed tightly to the surface of the wood by running your fingernail along the edge (key tip)! I left the areas around the center points untaped, to create a triangle shape. I think it adds that Art Deco touch, and makes the stripes look like they're radiating from those points.
5) Now, spray! You'll do two coats of gold, waiting a few hours between coats (or whatever is listed on the can). Let the gold paint dry overnight, then peel the tape off. Use a sharp x-acto blade to gently scrape any paint areas that might have snuck under the tape.You should hopefully be happy with the results, at this point, but it gets better!

6) Use the clear gloss lacquer over the entire frame (you'll need to re-set some newspaper back over the mirror), following the directions on the can. This not only sets the gold paint nicely, but gives the mirror a sealed, factory-like finish.

Let it dry, then hang and enjoy! I'm really happy we were able to give this mirror a second chance, because it was headed for the donation pile. The clear lacquer even makes the wood look richer than before, so it's a major improvement. I'm definitely happy to see it every morning when I get ready.
I think this would also be cool to do to a picture frame. That's why I love spray paint — you can use use it to transform just about anything. What have you guys been making over this spring? And who's going to see Gatsby?
DIY: Elastic Hair Ties
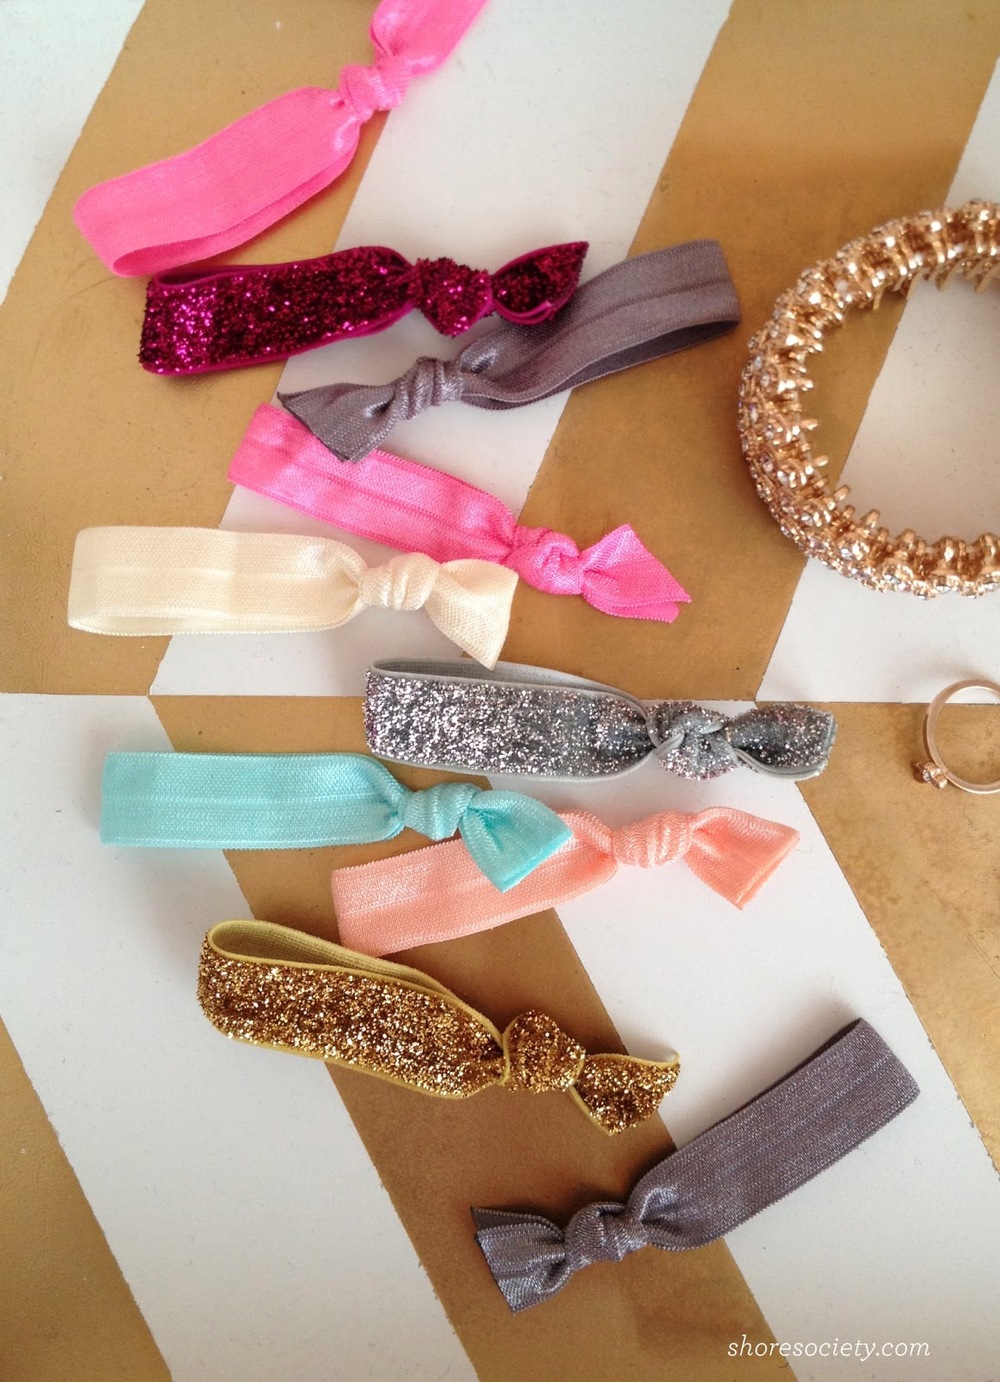
I was this close to buying a set of hair elastics from Anthropologie a while back, but stopped short after I saw the price tag. $12 for only FIVE? Yikes! I put them back, thinking I could find them cheaper elsewhere, until I found a couple of tutorials online and decided to make them myself.
This was ridiculously easy, and I was able to make about 45 hair ties for only $11 (take that, Anthropologie).
YOU'LL NEED:
Foldover elastic in 5/8" size - as many yards and whatever colors you'd like. Each yard makes about 4 hair ties. I purchased my elastic here.
Sharp scissors
Lighter
Ruler

Measure and cut a piece of elastic (flat) to 8.25". If you have thicker hair, add another quarter or half inch. Also something to note: the glitter elastics seem to be less stretchy than the solids, so I added a half inch to those. Otherwise, they wouldn't fit on my wrist!

Tie ends in a knot, leaving about half-inch sized tails, and trim ends together at an angle.

Using a lighter, you'll seal the ends to keep them from fraying. Hold the flame close to the ends, without touching them. You'll see the fibers melt a little, creating a finished edge.

And you're done! This is an easy, mindless thing to do while crushing through episodes of Homeland (obsessed with that show) or whatever you please :) I love these ties because they don't leave a big crease in your hair, and they look cuter on your wrist for those emergency ponytails. Hopefully this saves you a couple bucks, too, because I know I won't ever be buying these!
DIY: Bold Striped Curtains

As I mentioned in my DIY Ombre Curtains post — window coverings can get pretty pricey. What's even more frustrating is when you just can't find what you want out there in the market. I had a vision for striped curtains, but they had to be BOLD — the bigger the stripes, the better.
I couldn't find them anywhere, until my old friend Pinterest led me to this post with instructions on how to make exactly what I wanted.
This was strikingly easy, but took some time. I also made four panels, since we used these on our living room window and our dining room window. They are the two windows in the front of the house, and we felt they had to match.
What you'll need to make 2 curtains (for one window):
2 cream grommet curtain panels (mine were from Pottery Barn)
5 yards black cotton twill fabric
4+ rolls of Stitch Witchery or other fusible web adhesive
4+ spools of 3/8" black grosgrain ribbon
Iron
White pencil or chalk
Rotary cutter or fabric scissors

Start by cutting your strips of black fabric. Depending on the size of your drapes, you'll want to do some math to figure out how long the stripes need to be. Mine were 84" long, and I wanted 4 black stripes, so I subtracted the grommet tab from the total length, then divided that by 7 (total stripes).
Phew - this is boggling my math-inept brain. Each stripe ended up being 11".
The length will be the same for all of the stripes except for the bottom one — it will have to be a couple inches longer, so it can be folded under for a finished look. For the rest, you will just leave the edges raw.
As for the width, you'll want to add at least an inch on each side, so they can also be folded around and secured on the back of the panel.

Disclaimer: this is our fugly attic carpet. But hey...we have a finished attic at least, right?
Lay your curtain panel out and place your stripes down, measure the spaces to make sure they're even, and get to ironing. Use a strip of Stitch Witchery at the edges of each stripe, and iron carefully to adhere the stripes to the panel. Don't worry about folding the raw edges over to create a seam - you'll just cover the raw edge with grosgrain ribbon, also attached with the Stitch Witchery.
Once you're finished attaching the stripes and ribbon, flip the panel to the other side, and fold extra stripe fabric over and secure with more iron-on adhesive. Also do this with the ribbon - it will give you a seamless, finished edge.

Here's a good shot of how the edges should look.

Repeat for the second panel, and you're done! Each panel took me about two hours, but by the time I was on my fourth I flew through it. I'm so happy with the process and how bold they look in our house. Our dining room totally pops, and the stripes also compliment the cozy neutral scheme we have in our living room. They work perfectly in both spaces.
Now that I've got a whole bag full of Stitch Witchery, I'm looking for more projects like this. If you have any ideas, send them my way!